Stages of a Portrait Drawing
The method for drawing the portrait in Classical Realism begins with the big overall general statement, and then focuses on planal forms, and lastly hones in on surface detail. The process employs layers of graphite, and several steps, which each take us to ever-increasing levels of refinement and sophistication.
Different stages will require a different way of seeing, and a different way of thinking, and a different way of handling our material, all of which will be covered in class time.
I am using as reference, a detail from a painting by Pietro Annigoni.
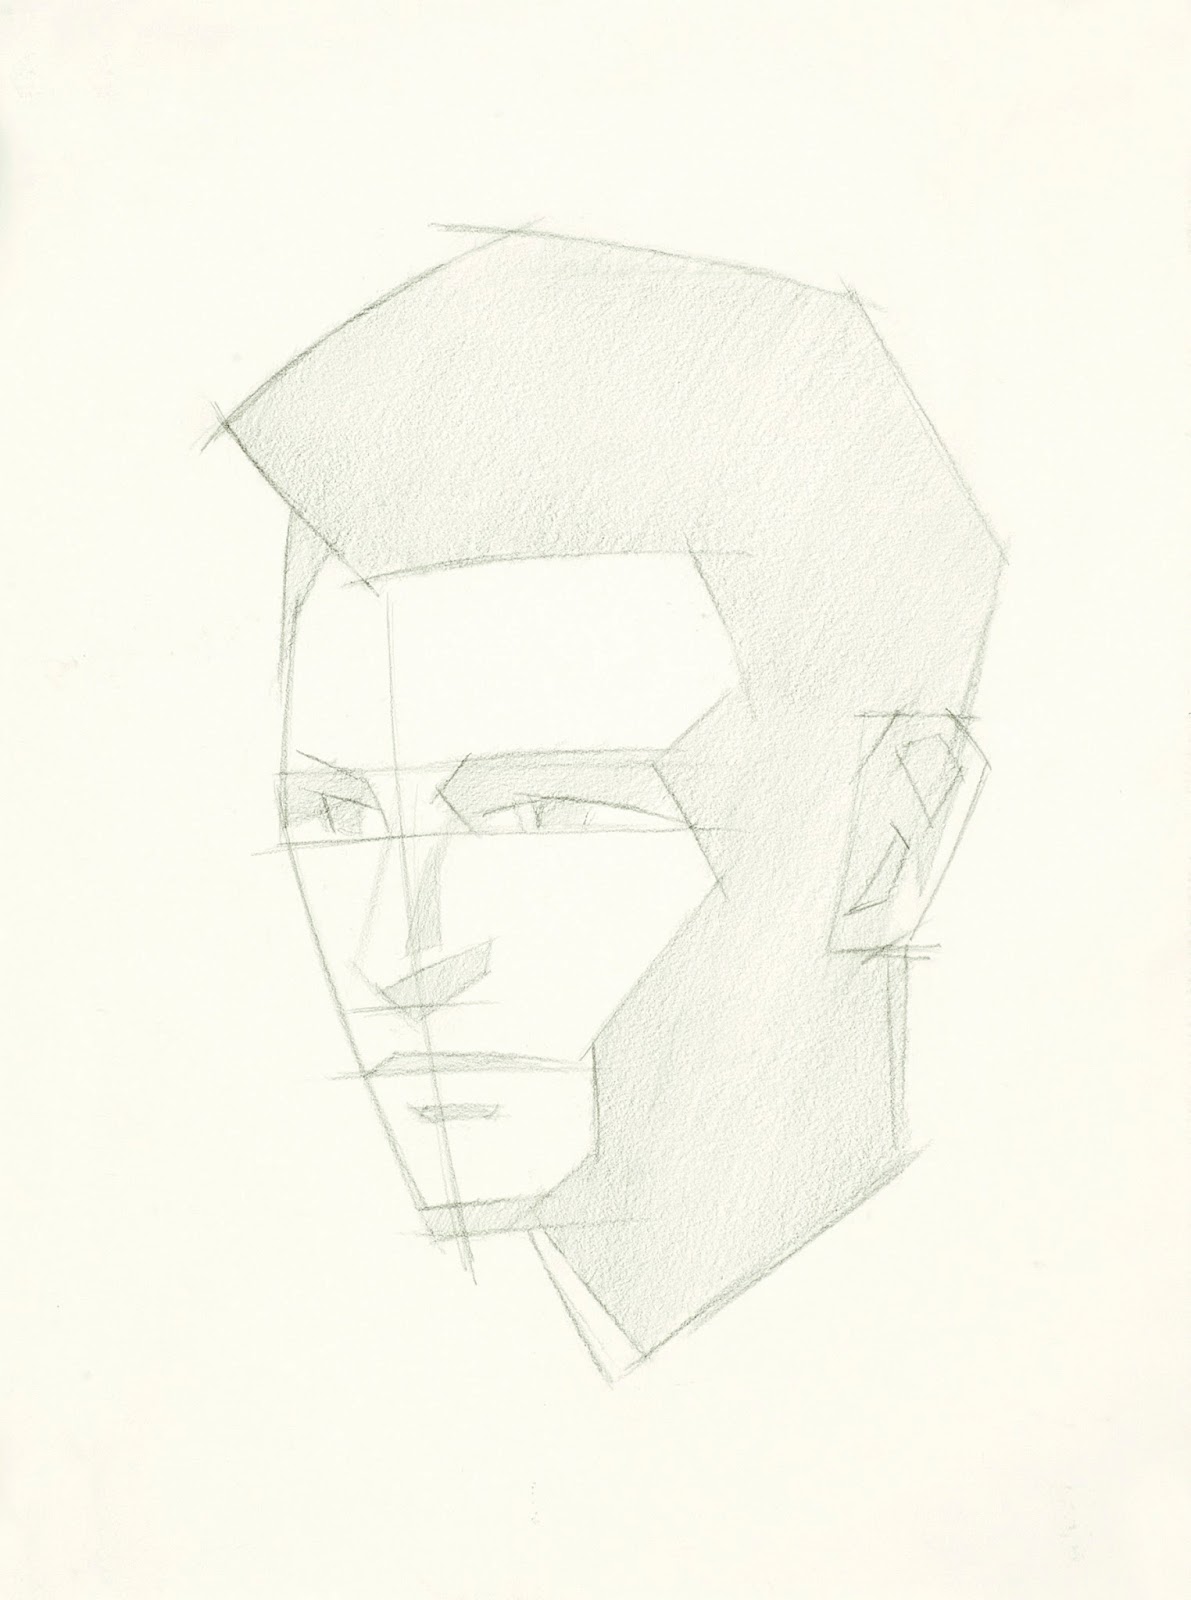
1.The Block-In
Spend the first five minutes observing the model, and make some measurements for proper placement of features and structural elements.
We start the block in of our drawing. Mark the top and bottom, and, with a knitting needle, measure the largest width of the entire head in relation to the largest height of the head. Mark the left and right of the drawing, and assess that the head will be correctly placed on the paper.
Using sketchy-ghosty lines, we block in the envelope of the head. This includes all the hair, and should show us the general tilt and orientation of the head.

© Mandy Boursicot 2013
2. The Construct
The construct stage is fairly quick, but crucial. We observe where the centre line of the features is. That is a construction line that passes through the glabella and the philtrum. This line gives us the axis of the head.
Next, we take a vertical measure with our knitting needle, from the bottom of the chin to the tear duct, and assess where this tear duct is located in relation to the whole height of the head. Place the eye line. In the same fashion we locate where the brow line, hair line, base of nose line and lip line are situated in relation to the whole height of the head.
All of our feature lines will generally be parallel to each other, and perpendicular to the centre line.

© Mandy Boursicot 2013
3. The Shadow Shapes
Just as we blocked-in the outer contours in a general fashion for the first stage, this is the stage where we block-in the general idea of where the shadows will go, and then place a light tone in the shadow areas. This tone can be #2, or #3 value.
© Mandy Boursicot 2013
4. The Articulation
We are now in a position to judge all our shapes better, because of the light tone placed into the shadow areas. The drawing has moved from a general line drawing to one that is concerned with masses.
First we should assess whether all the large shapes are right, and make corrections to the big picture first. We assess whether our measurements for placement of feature lines were right, whether our alignments and width placements of shadow shapes were right.
Once those major corrections are done, we can now go through form by form, with all the smaller undulations of the shadow areas, and their corresponding light areas. We make those smaller articulations, and tone in that shadow area darker, to a value #5 or #6.
In this stage we are creating a two-tone light-and-dark silhouette. The two tones are the white of the paper for the lights and the #5 or #6 of the shadows.
We make no differentiation between anything in the lights, nor anything in the darks.

© Mandy Boursicot 2013
5. The Grouping of the Darks
This stage is concerned with keying the darkest areas of the portrait. On a dark-haired model, this would typically consist of the hair in shadow.
Also, if we are drawing a model in dark clothing, the areas of shadow may need to be toned in darker again than the original value #5 or #6.
We now have a drawing that still has a graphic look to it, but consists of three values: the white of the paper, the #5 or #6 for face in shadow, and #8 for hair or dark clothing in shadow.

© Mandy Boursicot 2013
6. The Big-Form Modeling
This stage is also conceptual in nature. We should understand our guiding principle, that we always work from the biggest form, the biggest idea, the most general statement to smaller and smaller ideas, forms and details.
In this stage therefore, we need to step back from the notion that we are drawing all the details of the model in front of us, and engage our conceptual brain, that is going to see each part of the model in its most basic geometric form.
Once again, we are concerned with creating a context in our lights (not the shadows).
We will model the head as an elongated sphere or egg shape, and the neck as a cylinder and the shoulders as a block.
This stage changes the graphic look of the previous stages to one of a volumetric statement.

© Mandy Boursicot 2013
7. Variations of the Darks
Now that we have established the context for our lights, we turn our attention back to the shadows. In this stage, we aim to bring all our shadows to a complete finish.
We deal with the absolute darkest areas first, that is the hair in shadow. Then we move to the bed-bug line and the turning of the outside form away from us. In a portrait, there are important variations in the dark areas, because these will by and large be the definition of the eyes, nose, lips, chin, ear, jawline and cheek bones.
The tonal range in the darks should be minimized, so that the viewer’s eye is less drawn to the shadows.
Reflected lights should not be erased out of our initial shadow value, but rather, they should simply appear by virtue of the darkening of surrounding bed-bug lines, turning of the form and cast shadows.
We should pay special attention in differentiating form shadows and cast shadows and use the rules which govern each of these separately.
And we should look for opportunities to include lost edges, and soften edges where edges need to recede.
Try to simplify the darks as much as possible.

© Mandy Boursicot 2013
8. Rendering of the Lights
This is the final stage of the drawing, and should be the stage in which time slows down, and we focus on rendering in order, the biggest forms, the medium forms, the small forms, the micro forms and so on.
Since we have already established the general context of the lights, it’s a good strategy to develop and render each form, segment by segment, to a complete finish.
In rendering these forms, we need to be delicate and subtle, and maintain the dominance of the governing larger volumes and the planal structure of the head. Small details must always be subject to fitting into a larger context. For each form and subsequent smaller and smaller forms that are rendered, we need to turn those forms and ensure that within its own context each form has a light, a mid- and a dark value to create the illusion of volume.
In this way we can convey the entire breadth and complexity of the portrait in one drawing.
