This article is from the February Opus newsletter. Thanks to Opus Art Supplies for creating such a comprehensive article about the method that I use. This article accompanies the latest two videos, created by the amazing Ryan Mund.
Part 1: http://www.youtube.com/
Part 2: http://www.youtube.com/
Painting the Portrait: The Grisaille Method in Oils

What is a Grisaille? (griz-eye)
For artists who train in the classical realist tradition, you first start working in graphite, then charcoal, and finally paint. The entry point for oil painting is creating the grisaille, which is a monochromatic painting using a 9-value scale to create the illusion of depth. The grisaille is a great launching point for artists who work in pencil and want to try oil painting. If you have a background in graphite, watch Mandy’s Introduction to Figure Drawing video to see how this value system works with graphite.

In this value system, our #1 value is the whitest white and #9 is our darkest black, with variations of grey for the values in between. Because a grisaille is a monochromatic painting it can be done with any colour plus a white. Opus Essential Oil Colours will be used for the black and white, and Gamblin Portland Greys will be the intermediate values. Having these greys are considered convenience colours as they save time in colour mixing. They also help to achieve a more accurate range of tonal values when mixing the mid-range colours.

Notes Before Getting Started
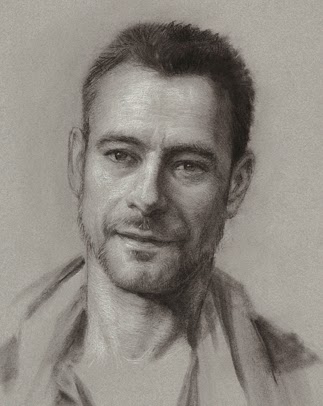
For this how-to, Mandy will use a Master Copy image as reference for her portrait. In the classical realist tradition, a live model is usually used as a reference. However, using a master copy can be useful for the learning artist to examine how the Master approached the painting.


This painting will also be completed over the course of two sessions. The first session focuses on the block-in and establishing an overall map of the painting. The second part is focused on rendering the variations of shadows and lights, as well as the fine details.
Setting up the Masterson Sta-Wet Palette
To begin we need to set up our 9-value scale onto the Grey Matters Paper Palette. Simply place the entire palette pad into the Masterson Sta-Wet Palette. Squeeze each individual colour onto the palette paper; these will represent 5 out of the 9 colours on the value scale.
#1. Titanium White
#3. Portland Grey Light
#5. Portland Grey Medium
#7. Portland Grey Deep
#9. Ivory Black

We are now going to mix to create the intermediate colours on our scale, 2, 4, 6, and 8 using two small Italian Palette Knives. Take some Opus Titanium White and Portland Grey Light and begin mixing the two values. We want to create a value that is exactly half way between the two colours, so mix this # 2 value until it visually looks about half way.


Always mix with the back of the palette knife and use the two knives to help get all of the paint off and mixed. You’ll need to clean the palette knives in between mixing, so use paper towel to wipe off the excess paint. This will ensure that your values 1 and 3 do not get another colour in them, thus tampering with the already set value.
The Steps for Painting a Grisaille Portrait – Part 1
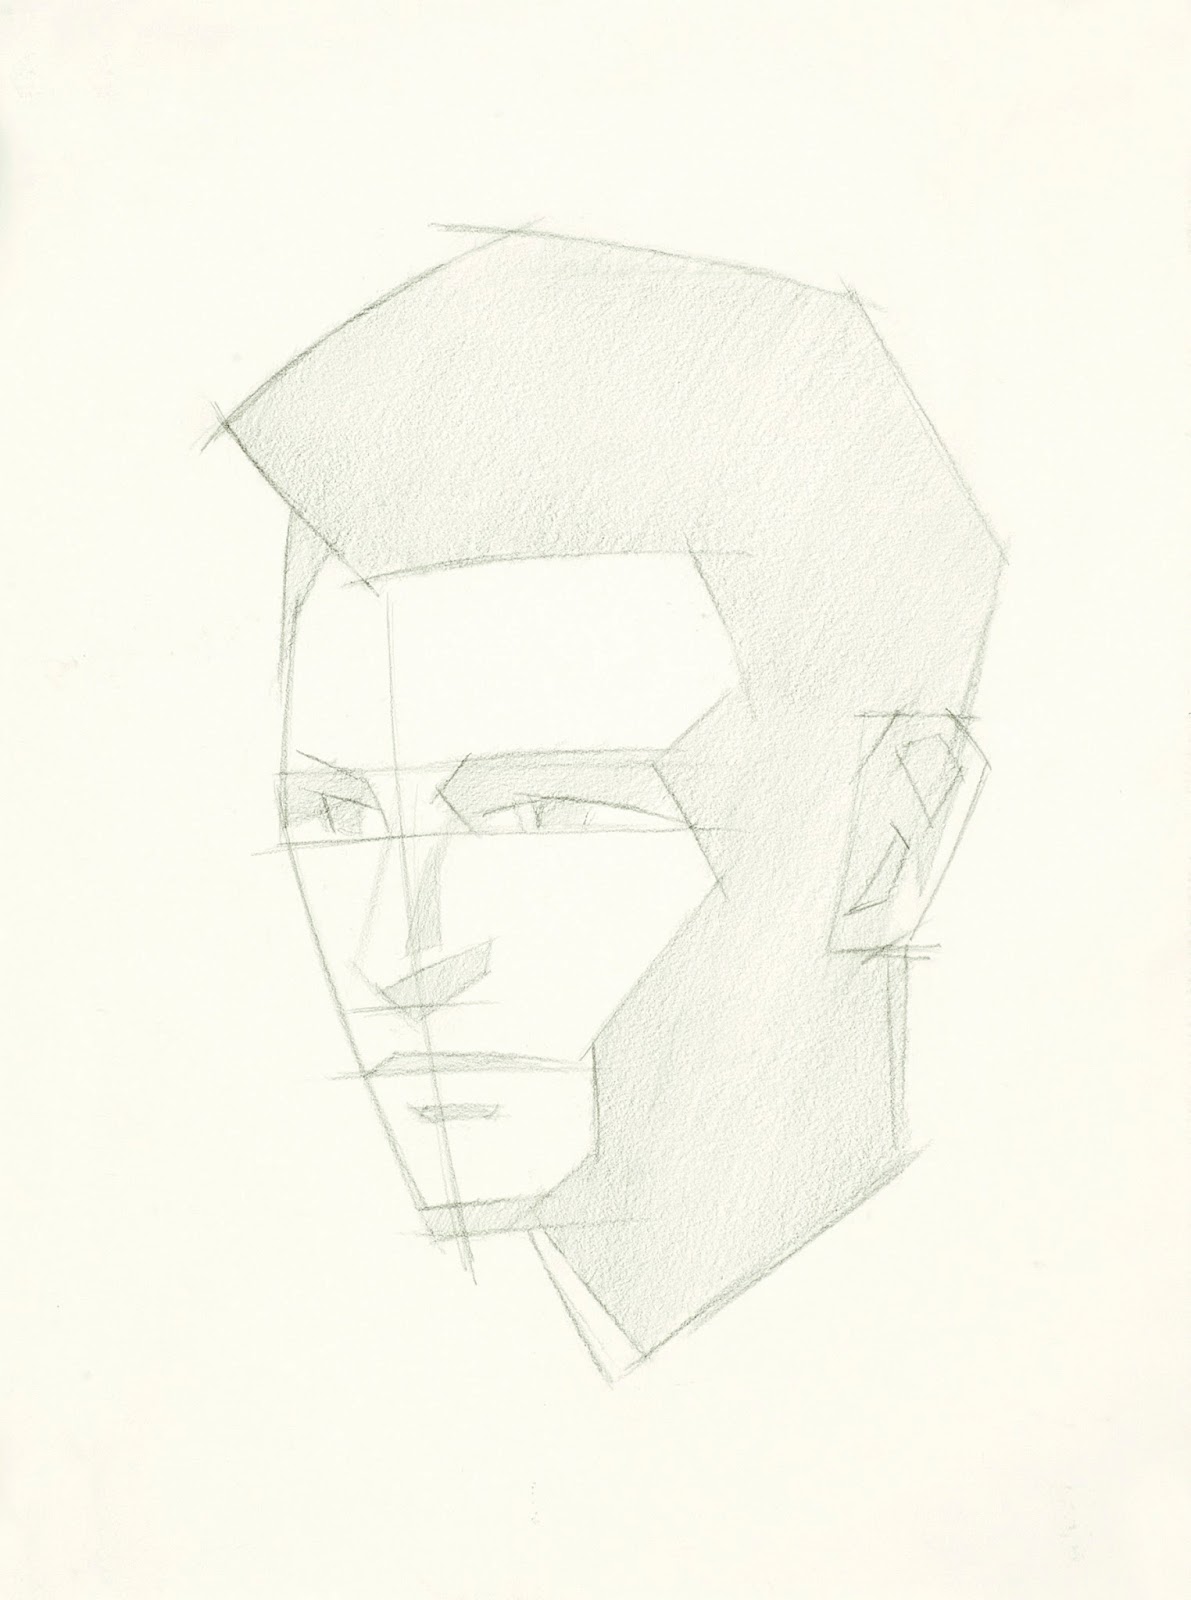
1. The Block-In

Using a #4 Opus Fortissimo Oil Brush, begin by diluting the black paint with Gamblin Gamsol to make it translucent. If it’s to thin, just wipe your brush off with a paper towel. The block-in consists of measuring the master copy image and using that comparative measurement to place the outer parameters of the portrait. Mandy uses a pair of knitting needles to compare her block-in lines to the master copy.


Paint placement marks for the top of the head, the bottom of the body, and the back of the head and the nose. You want to block-in the overall shape, so this step will be loose and quick. Use straight-line articulation (painting in straight lines that all go in the same direction) for your marks and think of it as making a big envelope for the overall shape of the subject.
2. The Construct

With the overall shape blocked in, continue using comparative measurements to place feature lines for the eyes, brow line, mouth and nose. With the overall block in complete; look at your work as if you were a sculptor. If this was a block of marble, the first thing you’d do is cut away the major parts that you don’t need, before ever going into the details. This is what the block-in and construct is for a 2D artist. You need to cut away the parts that aren’t needed and within that framework is what needs to be refined.


3. The Shadow Shapes

To refine the framework that has been created in step 1 and 2, we turn our attention to the shadows. Step aside from the idea that you are painting a detailed portrait and simply look for patterns of light and dark tones that make up the shadows.
With a #4 brush, map out and lightly tone in the shadow shapes so we can achieve a 2-value pattern of light and darks. Use pure black with some solvent and dry off the brush as much as possible between dipping the brush in solvent with paper towel. This gives you those loose, sketchy, ghosty lines that will only tell the big picture story of the portrait.


The first 2 steps focused on using linear lines, but now with the shadow shapes our painting is moving to one that is about mass and volume. Once we do that our painting starts to look like the original, whether you are working from a master copy or subject from real life. It should now be much easier to gauge whether you are achieving the right portions and shape of the model.
Tip: Turning a painting upside down can help you focus on shape rather then getting lost in the details. It removes one from the idea that you are painting a portrait and forces us to look at things more abstractly. When you look at shapes in an abstract way, you can focus on portion and value, rather then that’s where the “nose, eyes, etc” should be. This technique really only works once the major proportions are in and you know that they are generally correct.

4. Paint the Background

The background in the master copy is just a little bit off black so you will need to mix a value that is between value 8 and 9. Use a #8 brush and mix the paint with the M. Graham Walnut Alkyd Medium. A bigger brush helps to cover more area and the medium will help the paint to dry quicker.


Painting the background is important because it frames the rest of the painting and is used to correct the overall shape of the head. The hair of our model is fairly loose, so brush some of the background colour into where the hair is help when you later refine it. Mandy prefers to paint her backgrounds as vignette, which means not all the way to edge of the paper and in some kind of interesting pattern.
5. Paint a Single Shadow Value

The painting now consists of 2 values – the white of the paper and the background colour. It’s time to move our portrait into 3-values by painting our shadows as one unified colour. This tone will be a mixture of values 6 and 7, so switch to a #6 brush and mix the two with medium. As a gauge, you want the paint to be the same consistency of mayonnaise.


Determining the direction of the main light source will inform as to what is in shadow and what is not. Do not paint any variations within the shadows; paint them all in that same unified colour. Try to establish a pattern of light and dark within the portraits bigger shapes. Keep in mind to always refine the bigger shapes and their placement as you move through the portrait.

Even reflected light that appears in the shadows should be marked in as this unified value. Later, these shadows will get lighter or darker to establish the terminator or bed bug line (the point where the figure turns and the light on it turns into shadow). When working with oils it is good to think of the painting as a series of corrections as every stroke can correct the last one.
6. Key the Painting
Now that we have established our shadows in one unified colour, put in one stroke of of our #1 value. This value establishes the direction of our main light source and will be the brightest white within the portrait.

The key light is crucial as it impacts the over all tone of the painting. High key paintings tend to have a light and happy feel, while having a low-key painting creates a more somber mood. By using the 9 value system, the painting has a full range of values in the key and will make the painting come across as very powerful and strong.
7. Paint the Lights

Using a #8 Princeton 6600 Brush, medium and values 2-5 on our value scale, begin to patch in the lights to show major plane shifts. We are now beginning to model the basic geometric forms, egg for head, cylinder for neck, rounded block for shoulders, etc.


There are two ways this step can be approached. One is to work from the key light and go from the brightest white to darkest white. The other option is going right next to that unified shadow tone and place the darkest white next to it to work darker to lighter. This step is essentially patching in the light values to build the bases on which the rest of the painting we hang.

Because this is the first layer in the painting, eliminate all the hard edges between each value. Oil paints are quite translucent, so if any hard edges are left to dry they will show through the next days layer. So before we end our first session and leave the painting to dry, the edges need to be softened.
End of Part 1
Proper Clean Up After Oil Painting

Step 1. Move the clean and unused piles of paint to a fresh sheet of paper on the Masterson Sta-Wet Palette. Cover box, and place in the freezer. Toss out the old sheet of palette paper.
Step 2. Clean off the brushes with paper towel as thoroughly as possible.


Step 3. Now you can pour your solvent, which in this case is Gamblin Gamsol, into the Silicoil Brush Cleaning Tank. Swish each brush separately and thoroughly in the tank and then wipe each one off with paper towel.
Step 4. Pour the dirty solvent out of the brush tank and into another glass jar. This ensures that the sediment in the oil paints do not collect in the Silicoil Brush Cleaning Tank.


Step 5. Next is washing each brush in the sink with Masters Soap. Once the brushes have been cleaned thoroughly, reshape the bristles of the brush and wrap each brush into a sheet of toilet paper. This helps the brush keep its shape and dry’s the hairs of the brush quicker.
Step 6. Place painting out of the way, standing upright and not lying flat.
The Steps for Painting a Grisaille Portrait – Part 2
Before you begin, take the Masterson Sta-Wet Palette out of the freezer and transfer the remaining clean piles of paint onto a fresh sheet of paper. Remix the intermediate values(values 2, 4, 6, and 8) as close to the tones achieved in Part 1.
![]()
8. Reassess and Correct Major Shapes
Compare the Master Copy image with the portrait and determine if there are any major shape differences. If there are any changes that need to be made, use the 2 knitting needles to adjust and correct by comparing the angle of the needles on each image. The background colour can be used to correct the outer form, so the needle on portrait matches the angle of the needle on the master copy. Be sure to step back periodically during this process to help see it from a different perspective.


9. Variations of the Darks

The transition into the variations of the darks is a natural progression when correcting the outside shape with the background colour. For now, the colour of the the shadows do not have the darkest dark or any reflected light within them. So the first step is to separate these shadows to create the forms and plane shifts of the model.


Use a wide range of brushes and organize them in the same sequence as the value strip. This gives you a have a variety of sizes for every colour and a designated brush to work in each individual value. It also saves you from having to clean each brush in between colours, meaning more painting time can be put in.

The original value put in for the shadows is about a value 6 and will represent the lightest shadow. At the end of our painting it will consist of values 6, 7, 8, and 9. Progress from the background colour to the lightest dark and start with bigger sized brushes, working your way to smaller brushes (#2) as you refine and add detail within the shadows.


Tip: A painting can be blended without using a blending brush and still look as if it is has been blended. When brush strokes are put side-by-side and are in very small value sequences, they create a beautifully rendered painting that consists of a mosaic of little brush strokes. If we blend we have to remember to only blend the edges, for example at the edge of value 6 and 7, lightly blend so the edge becomes a 6.5.

10. Rendering of the Lights

We now need to focus on values 1-5, so clean the brushes used for the variations of the darks and begin with a #4 and #6 brush. As always, focus on the bigger forms (side of the cheek)to establish the whole plain before working on the smaller forms (wrinkles).


In oil paint, white is very opaque and any values that are lighter (mixed with white) are going to have more coverage then the darker values. There are lots of tiny value steps needed when painting the lights and they need to be transition accurately to describe the change from one form to another. This can be done with smaller brushes, smaller intervals of value shifts, painting wet-into-wet, and painting over the edges of two values with it’s mid-tone.


We need to paint in a logical sequence of value gradation that follows the shapes in the portrait. So it often becomes a question of over painting what we need in terms of the darker colours and then correcting that shape with next brightest colour that we put down.

Once you have painted the darkest lights, move to the highest register of light (value 1). Switch to a larger brush (#8) for more coverage and start by keying the painting with value 1. Now paint from the brightest white and progress darker and darker as you model around the brightest whites. Continue using this progression until all the lights have been placed and transitioned appropriately.


11. Reassess and deal with Edges
The final stage is the push and pull of reassessing, correcting, and blending the major values already placed. First look at your background colour and see if that needs adjusting. Now the rest of the fine details can be addressed with smaller brushes to soften the transitions between shadow and light. You will need to blend and knit all the brushstrokes together by using two brushes of adjacent values. Sometimes it requires a third clean brush to meld the two patches together. There should be a variety of soft edges, hard edges, and lost edges.


As you go through form-by-form you may find new things to adjust, but this is the nature of oil painting. Slow down during this process so you can accurately adjust the portrait until it looks as life-like as the master copy. After the push and pull, let painting sit to dry for about a month? prior to handling.

For more of Mandy’s artwork visit her website mandyboursicot.com or her blog Classical Drawing to learn more about the methods used in classical realist art.